17 Sep Facebook Business Manager
How to Start Marketing Your Product or Service
With a reach of 1.4 billion people, there’s no denying that Facebook is the social media app for marketing. In fact, 91% of marketers invest in the social media site to help them expand their reach and thus, their sales, because of its notoriety.
Not only are users active on the website, they’re spending nearly 33 minutes a day scrolling through posts and interacting with friends, family members and businesses. If you’re selling a business or service, you simply can’t afford not to be present. Plus, Facebook makes it really easy to reach your target audience with Business and Ad Manager functions.
What Is Facebook Business Manager?
Facebook Business Manager is an intuitive tool that makes it possible to manage all of your Facebook and Instagram pages, ad accounts and assets in a single place. Because more than one person is often involved in running a business, it allows for partial or full access to authorized users. In the Business Manager tool, you can schedule posts for both Facebook and Instagram. You can also gain insight into how your posts are performing and keep up with all messages, alerts and notifications.
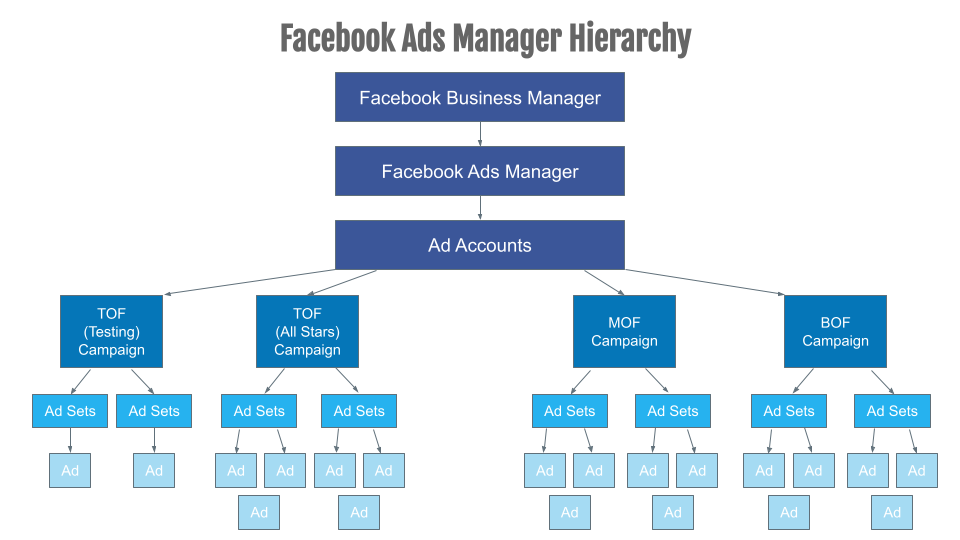
What Is Facebook Ads Manager?
Part of reaching your target audience is tailoring ads specifically to them. Within the Facebook Ads Manager tool, you can handle everything related to your marketing efforts, particularly your ads. Set up campaigns, view statistics to see how they’re doing and adjust as necessary to gain the most bang for your buck.
12 Steps to Using Facebook Business Manager
If you’ve never used the tool before, don’t fret! It has a user-friendly interface that anyone can operate. There are 12 basic steps to get started.
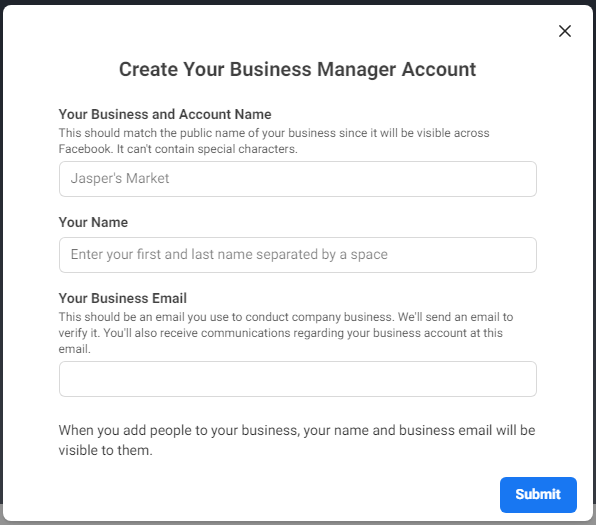
1. Create a Business Manager Account
This is the first thing you have to do to use the tool. However, be warned that you can only create two of these accounts. Before you can create a Business Manager account, you first need to have a personal account for identity verification purposes.
To get started, visit business.facebook.com/overview.
Here, you’ll click on “Create Account” and follow the prompts, which include naming your business, as well as adding your contact and business details.
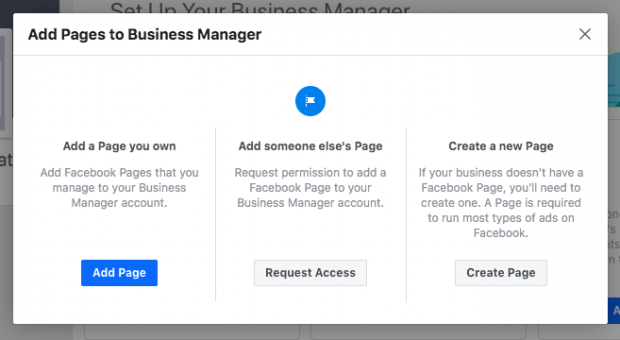
2. Create or Add Your Facebook Page
To manage accounts, you need to tie them to your Business Manager account. Before you can do so, you need to meet specific criteria, including:
- Must be an admin in the Business Manager
- Be an admin on the Facebook page for at least seven days
- Must own the Facebook Page you’re trying to add; it can’t be owned by another business or person
Once you’re certain you meet these criteria, adding the page is simple. Click on Business Settings, navigate to Business Assets and click accounts, then pages. In the dropdown menu, select “Add,” then “add a page.” Once you enter the page name or URL, click “Add Page,” which will automatically tie it to your account.
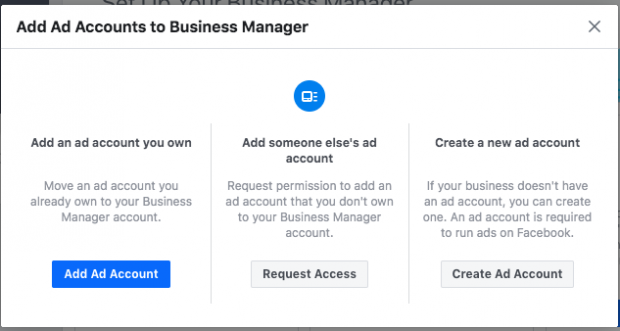
3. Create or Add Your Facebook Ad Account
Within the Business Manager tool, you can either create a new ad account or add an existing one. If you add it, know that this is a permanent move. You have to have admin access in the Business Manager tool and be the owner of the Facebook ad account you’re adding. This action cannot be reversed, so ensure it’s the right account before saving any changes. You’ll need the account ID to transfer an existing account.
If you want to create a new ad account, you can do that here, too. Simply click on Accounts in the Business Settings option. Click “Ad Accounts” and choose “Add.” From here, you’ll choose whether you want to add an existing account or create a new account and follow the prompts.
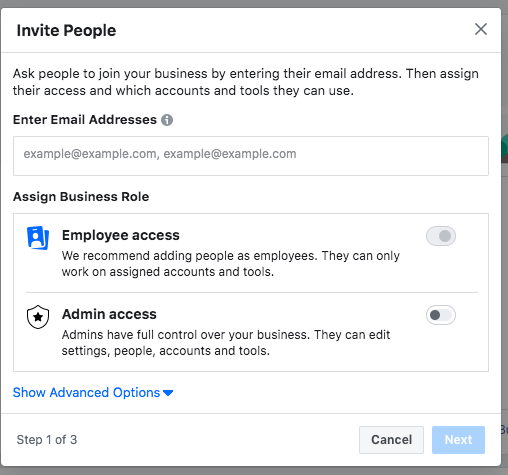
4. Add Team Members and Assign Access
As an admin, you can add people to help manage pages. In the business settings option, click “people” just below Users. Once you’ve selected the person, you can then click “Add Assets” and then “Pages.” From there, you’ll be able to give team members access to specific tasks via a toggle list. You can also grant a user full access by choosing “admin access.” Be sure to save your changes, or you’ll have to start all over.
5. Add Your Business Partners and/or Ad Agency
Adding your business partners is much like adding team members. Here, you’ll click Partners below Users, and then “Add.” Select the “Give a partner access to your assets” option then enter their Partner Business ID. When you click “Next,” it’ll let you select specific pages and assets. Be sure to save changes before you navigate away.
6. Add Your Instagram Account
Since Facebook also owns Instagram, it’s beneficial to tie the two pages together. This way, you can cross-post to both sites and control the scheduling of ads and posts from a single location. Additionally, you’ll be able to see statistics in one place, which makes compiling data easy.
To add an Instagram account, click Business Settings then select Instagram Accounts. From here, you’ll click claim new instagram account, add your credentials and then click next. Here, you’ll authorize ad accounts and then save changes.
7. Add and Verify Your Domain
To add your domain, select Brand Safety and then Domains from your Business Settings menu, and then type your domain in the pop-up after selecting the “add” option. You do need to verify your domain as well and there are two methods:
- DNS – Click on the DNS verification tab to grab the TXT record. You’ll then need to enter this in your DNS records section of the domain provider’s website. Follow the prompts and then head back to the DNS verification tab in your Business Manager. Click the verify button. The status will change to verified within 72 hours.
- HTML file upload – This involves going to your domain and uploading the HTML verification file from the Business Manager to your actual website — typically, the root directory. Once you upload it to the website, follow the same steps as above to verify the page. This method may also take up to 72 hours.
8. Create Your Facebook Pixel
The Facebook Pixel is a data tool, a code that helps garner insight into your website statistics. It’s easy to create using Business Settings. Select the business you want to add it to, click data sources and then select the “pixels” option. From here, you’ll choose to “add” and name the pixel. You can also enter your website URL if you like. From there, you can set it up and install it on your domain to start gathering information.
9. Set Up Your Event Priority in the Aggregate Event Measurement Tab
In the Events Manager tool, click on the pixel for the account you want to set priorities for. Select the tab that says Aggregated Event Measurement and then choose Configure Web Events. It’s important to read through the introduction to understand the process.
Select the verified domain you want to configure and then “Edit Events.” Navigate to the Pixel/Custom Conversion option and then pick the event. Choose the number of value sets.
10. Add Two-Factor Authentication for the Highest Level of Security
Security is very important, and two-factor authentication can help cut down on fraud. It’s easy to set up, too. Simply navigate to the Business info and then select Business Options. The dropdown menu will let you select two-factor authentication. From here, you can choose admins only, everyone, or no one if you choose not to use it.
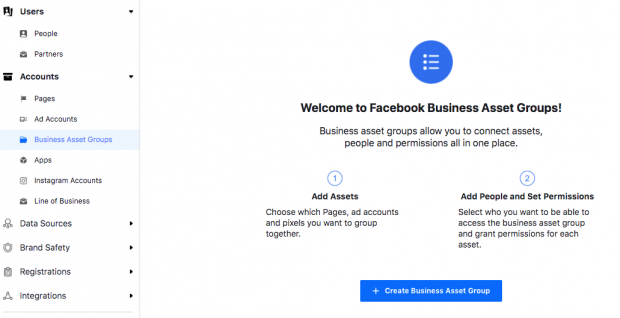
11. Create a Business Asset Group
Business asset groups make it easy to organize your business operations by brand, region or even the line of business. Decide how to organize before you get started to make setup quick and efficient.
To get started, select Business Settings and navigate to the “accounts” option. From here, you’ll choose Business Asset Groups and then “add.” Enter the name of an asset group and click next. Assign the assets then continue on where you can assign people to work on these groups as well as permissions.
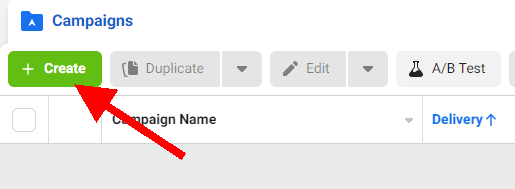
12. Create Your First Campaign
Now, you’re ready to create your first campaign. How exciting!
To do so, you’ll go to the Ads Manager tool and click on the green “Create” button. After this, follow our in-depth, step-by-step guide and you’re well on your way.
With these 12 steps, you’ll be a Facebook Business Manager pro in no time. You can do it for one or multiple businesses following the same instructions. Once everything is set up, you’ll have a wealth of information about your company, insights into revenue and conversions all at your fingertips.
If you want to get the most out of your Facebook ad budget — and who doesn’t? — contact us at Innovation Exchange and let us lead the way to a brighter future for your business.
No Comments